Mastering How To Use Access Raspberry Pi Behind Router: The Ultimate Guide
Have you ever wondered how to access your Raspberry Pi behind a router? Let’s face it—getting your Pi online can sometimes feel like solving a Rubik’s Cube blindfolded. But don’t sweat it! Today, we’re diving deep into the world of Raspberry Pi networking, and trust me, by the end of this guide, you’ll be a pro at accessing your Pi from anywhere.
Whether you're a tech enthusiast, a hobbyist, or someone who just wants to set up a home server, understanding how to access Raspberry Pi behind a router is an essential skill. This setup opens the door to countless possibilities, from remote monitoring to building your own cloud storage. So, buckle up because we're about to demystify the process step by step.
This article isn’t just about theory. We’re going practical, breaking down each step with actionable tips, real-world examples, and even troubleshooting advice. If you’ve ever struggled with port forwarding, dynamic DNS, or SSH connections, this is the perfect place to start. Let’s make your Raspberry Pi accessible and secure, no matter where you are.
Table of Contents
- Introduction to Raspberry Pi Networking
- Understanding the Basics of Accessing Raspberry Pi
- Tools and Software You’ll Need
- How to Set Up Port Forwarding
- Dynamic DNS: Making Your Pi Reachable
- Using SSH to Access Raspberry Pi Remotely
- Enhancing Security with a Raspberry Pi VPN
- Configuring Your Router’s Firewall
- Troubleshooting Common Issues
- Conclusion: Your Next Steps
Introduction to Raspberry Pi Networking
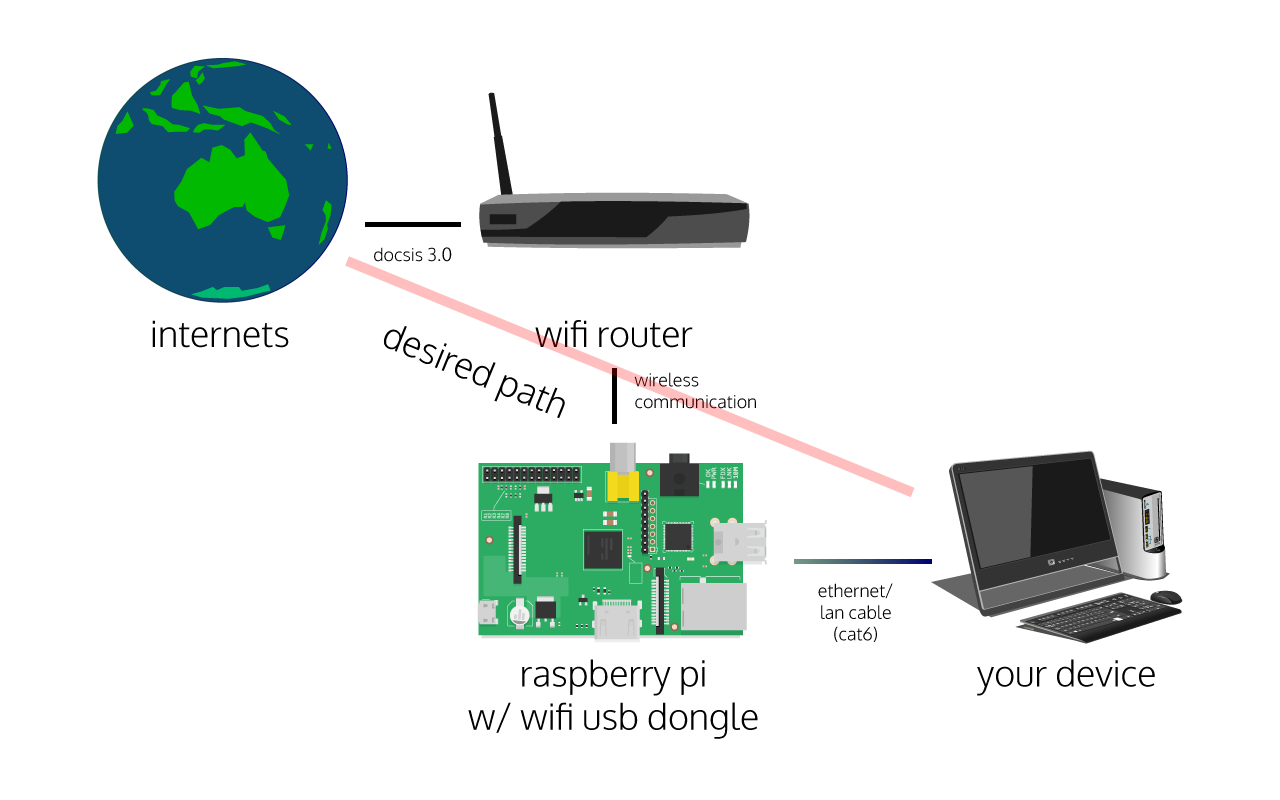
Alright, let’s get one thing straight—Raspberry Pi is more than just a tiny computer. It’s your gateway to innovation, and learning how to use access Raspberry Pi behind router is like unlocking a superpower. But before we dive into the technicalities, let’s break it down: your Pi is essentially a device on your home network. To access it from outside your network, you need to navigate through your router's defenses.
Think of your router as a bouncer at a club. It controls who gets in and out, and by default, it blocks unauthorized access to your Pi. That’s where the magic of port forwarding, SSH, and dynamic DNS comes in. These tools help you bypass the router’s restrictions while keeping your network secure. We’ll explore all of them in detail, but first, let’s talk about why you’d want to do this.
Why Access Raspberry Pi Behind Router?
There are countless reasons why you might want to access your Raspberry Pi remotely:
- Remote Monitoring: Check the status of your home automation system or security cameras.
- File Sharing: Access your media library or important documents from anywhere.
- Cloud Storage: Use your Pi as a personal cloud server for backups.
- Development: Test websites, applications, or IoT projects remotely.
Whatever your reason, mastering this skill will save you time and effort. Plus, it’s just plain cool to control your Pi from halfway across the world. Now, let’s move on to the basics.
Understanding the Basics of Accessing Raspberry Pi
Before we jump into the nitty-gritty, let’s cover some foundational concepts. Accessing Raspberry Pi behind router involves several key components:
1. IP Address
Your Raspberry Pi has an IP address, which is like its home address on the network. By default, your Pi gets a local IP address assigned by your router. This address is usually in the format 192.168.x.x or 10.x.x.x. However, this IP is only accessible within your local network. To access your Pi from outside, you’ll need to map it to your router’s public IP address.
2. Ports
Ports are like doors that allow specific types of traffic to pass through. For example, port 22 is used for SSH connections, and port 80 is used for HTTP traffic. To access your Pi remotely, you’ll need to open the necessary ports on your router and direct them to your Pi’s local IP address. This process is called port forwarding.
3. Protocols
Protocols define how data is transmitted over the network. For accessing Raspberry Pi, you’ll likely use SSH (Secure Shell) for command-line access or HTTP/HTTPS for web-based services. Understanding these protocols will help you configure your Pi correctly.
Now that we’ve covered the basics, let’s talk about the tools you’ll need.
Tools and Software You’ll Need
To access Raspberry Pi behind router, you’ll need a few essential tools:
- Raspberry Pi: Duh! Make sure your Pi is up and running with the latest version of Raspberry Pi OS.
- Router Access: You’ll need admin access to your router to configure port forwarding and other settings.
- SSH Client: Use tools like PuTTY (Windows) or Terminal (Mac/Linux) to connect to your Pi via SSH.
- Dynamic DNS Service: Services like No-IP or DuckDNS make it easier to access your Pi using a domain name instead of an IP address.
- Firewall Software: Optional but recommended for enhancing security.
Don’t worry if you’re not familiar with some of these terms—we’ll walk you through each one in the upcoming sections. For now, just make sure you have everything ready to go.
How to Set Up Port Forwarding
Port forwarding is the cornerstone of accessing Raspberry Pi behind router. It allows you to direct incoming traffic from your router’s public IP address to your Pi’s local IP address. Here’s how you do it:
Step 1: Find Your Router’s Admin Page
Open a web browser and type your router’s IP address (usually 192.168.0.1 or 192.168.1.1) into the address bar. Log in using your admin credentials. If you don’t know them, check your router’s manual or try the default username/password (usually admin/admin).
Step 2: Locate the Port Forwarding Section
Every router is different, but most have a section labeled "Port Forwarding," "Virtual Servers," or "NAT." Look for this and proceed to the next step.
Step 3: Add a New Rule
Create a new rule with the following details:
- Service Name: Give it a descriptive name, like "Raspberry Pi SSH."
- External Port: The port you want to use for external access (e.g., 22 for SSH).
- Internal IP Address: Your Raspberry Pi’s local IP address.
- Internal Port: The port your Pi is using for the service (e.g., 22 for SSH).
Step 4: Save and Test
Save the rule and restart your router if necessary. To test, use an SSH client from outside your network and connect to your router’s public IP address on the specified port.
Port forwarding is powerful, but it can also be risky. That’s why we’ll talk about security in a later section. For now, let’s move on to dynamic DNS.
Dynamic DNS: Making Your Pi Reachable
Your router’s public IP address can change periodically, which makes it hard to access your Pi consistently. That’s where dynamic DNS (DDNS) comes in. DDNS services assign a domain name to your IP address and update it automatically when it changes.
How to Set Up Dynamic DNS
Here’s a simple guide to setting up DDNS for your Raspberry Pi:
Step 1: Choose a DDNS Provider
Popular options include No-IP, DuckDNS, and Dynu. Most offer free plans that are sufficient for personal use.
Step 2: Create an Account
Sign up for a free account and create a hostname (e.g., mypi.ddns.net). This will be the address you use to access your Pi.
Step 3: Configure Your Router
Log in to your router and look for a DDNS section. Enter your DDNS provider’s details and save the settings. If your router doesn’t support DDNS, you can install a DDNS client on your Pi instead.
Step 4: Test Your Setup
Use the hostname to connect to your Pi from outside your network. If everything is set up correctly, you should be able to access it without issues.
Dynamic DNS simplifies the process of accessing your Pi, but it’s just one piece of the puzzle. Next, let’s talk about SSH.
Using SSH to Access Raspberry Pi Remotely
SSH (Secure Shell) is the go-to method for accessing Raspberry Pi behind router. It provides a secure, encrypted connection that lets you control your Pi from anywhere. Here’s how to set it up:
Step 1: Enable SSH on Your Pi
By default, SSH is disabled on Raspberry Pi OS. To enable it, open the terminal and type:
sudo raspi-config
Choose "Interfacing Options," then "SSH," and enable it. Alternatively, you can create an empty file named "ssh" on your Pi’s boot partition.
Step 2: Install an SSH Client
On Windows, use PuTTY. On Mac or Linux, you can use the built-in Terminal. Connect to your Pi using the command:
ssh pi@[your_pi_ip]
Step 3: Secure Your SSH Connection
Change the default password for the "pi" user and consider disabling password authentication in favor of SSH keys. This adds an extra layer of security.
SSH is fast, reliable, and secure. With it, you can manage your Pi from anywhere, whether you’re troubleshooting a server or running a script. But what if you want even more security? That’s where a Raspberry Pi VPN comes in.
Enhancing Security with a Raspberry Pi VPN
A Raspberry Pi VPN creates a secure tunnel between your device and your Pi, encrypting all communication. This is especially useful if you’re accessing your Pi over public Wi-Fi or untrusted networks.
Setting Up a Raspberry Pi VPN
Here’s a quick overview of setting up a Raspberry Pi VPN:
Step 1: Install OpenVPN
On your Pi, run the following commands:
sudo apt update
sudo apt install openvpn
Step 2: Configure OpenVPN
Download an OpenVPN configuration file from a trusted provider (e.g., NordVPN, ProtonVPN) and copy it to your Pi. Then, start the service using:
sudo openvpn --config [config_file].ovpn
Step 3: Connect to the VPN
Once the service is running, all traffic to and from your Pi will be encrypted. You can now access your Pi securely from anywhere.
A Raspberry Pi VPN adds an extra layer of protection, but it’s not a replacement for good security practices. Let’s talk about configuring your router’s firewall next.
Configuring Your Router’s Firewall
Your router’s firewall is your first line of defense against unauthorized access. Properly configuring it can prevent malicious attacks while allowing legitimate traffic to pass through.
Best Practices for Router Firewall Configuration
- Enable SPI (Stateful Packet Inspection): This blocks unauthorized incoming traffic.
- Block Unused Ports: Only open the ports you need for your Pi.
- Use Strong Passwords: Change your router’s default credentials and use complex passwords.
- Regularly Update Firmware:


