How To Draw A Pumpkin: The Ultimate Guide For Beginners And Pros
Alright, let’s jump right into it, folks! If you're here, chances are you're ready to unleash your inner artist and learn how to draw a pumpkin like a pro. Whether you're doodling for fun, prepping for Halloween, or just feeling crafty, this guide’s got your back. Drawing a pumpkin doesn’t have to be scary—trust me, I’ve got some killer tips that’ll make it as easy as pie. So grab your pencil, a blank sheet, and let’s get started!
Now, before we dive into the nitty-gritty, let me just say this: drawing isn’t about being perfect. It’s about having fun and expressing yourself. That’s why this guide isn’t just about how to draw a pumpkin—it’s about how to enjoy the process. So, if you’ve ever thought, “I can’t draw a pumpkin,” think again. You totally can, and we’re about to prove it!
Oh, and one last thing before we roll: this guide is packed with step-by-step instructions, pro tips, and even a few cool tricks to spice up your pumpkin art. So stick around, and by the end of this, you’ll be drawing pumpkins like a champ. Let’s do this!
Why Learning How to Draw a Pumpkin is Worth Your Time
Here’s the deal: pumpkins aren’t just for Halloween. They’re symbols of autumn, harvest, and creativity. Learning how to draw a pumpkin can be a great way to tap into your artistic side, whether you're a beginner or a seasoned artist. Plus, it’s a fun activity that can help you relax and unwind. Who doesn’t love that?
But here’s the kicker: mastering the art of drawing pumpkins can also boost your confidence. Once you’ve nailed down the basics, you’ll find yourself tackling more complex designs. Think about it: if you can draw a pumpkin, you can draw anything! And trust me, there’s nothing more satisfying than seeing your artwork come to life on paper.
Getting Started: What You’ll Need
Before we dive into the drawing process, let’s talk about what you’ll need. Don’t worry, it’s not rocket science. All you need is:
- A pencil (or a pen if you’re feeling bold)
- A blank sheet of paper
- An eraser (because mistakes happen, and that’s okay!)
- A ruler (optional, but helpful for clean lines)
- Your imagination (the most important tool of all!)
And that’s it! No fancy art supplies needed. The beauty of drawing is that you can do it anywhere, anytime, with just a few basic tools.
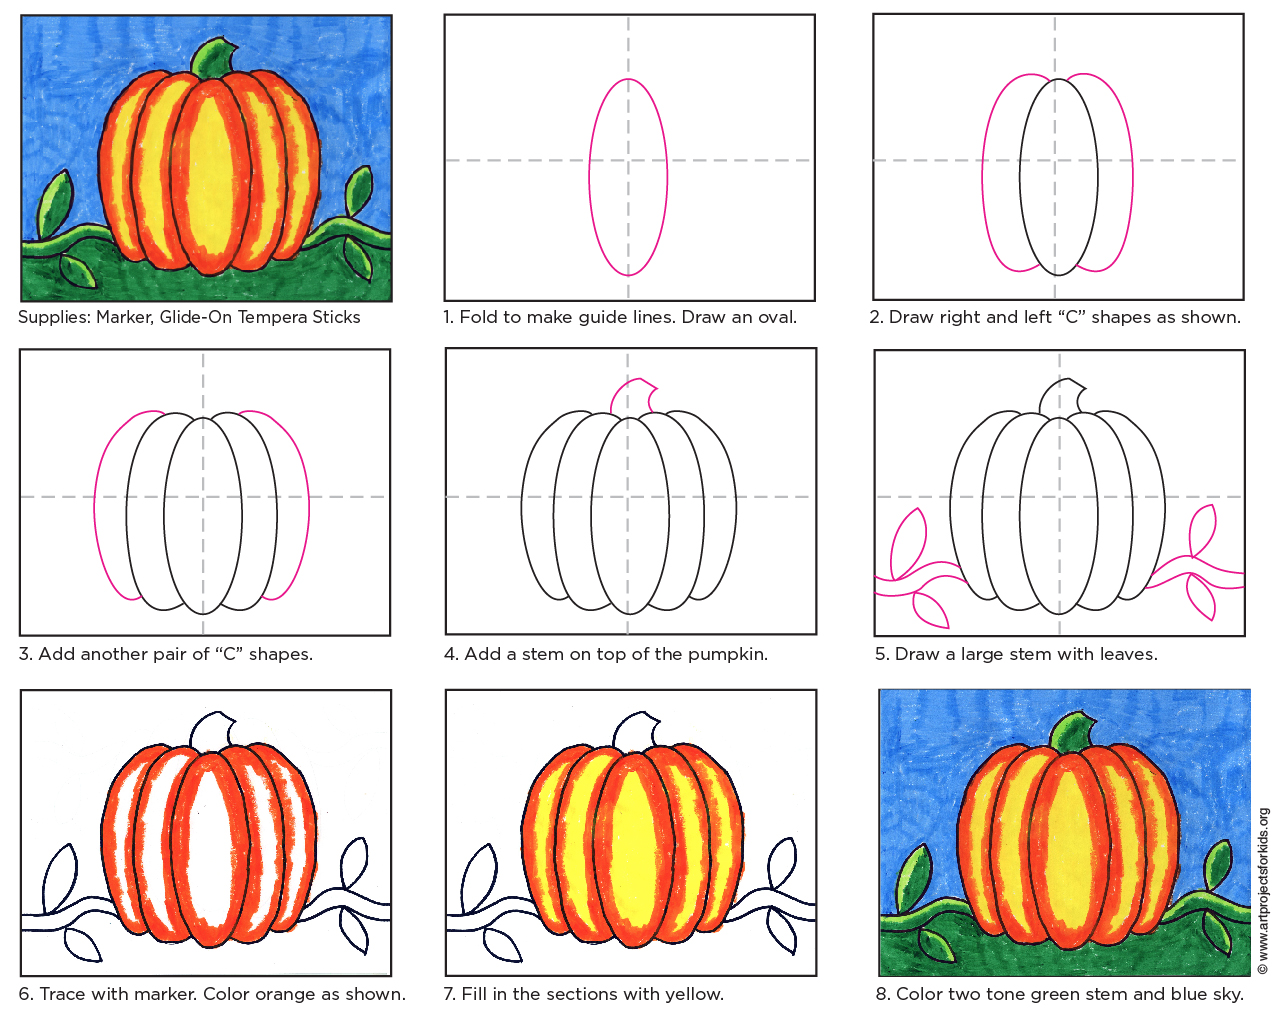
Step-by-Step Guide: How to Draw a Pumpkin
Step 1: Start with the Basic Shape
Alright, here’s where the magic begins. The first step in learning how to draw a pumpkin is to sketch the basic shape. Think of it as the foundation of your masterpiece. Start by drawing a large oval or circle—this will be the body of your pumpkin. Don’t worry if it’s not perfect; remember, pumpkins come in all shapes and sizes!
Step 2: Add the Ribbing
Now that you’ve got the basic shape down, it’s time to add the ribbing. Pumpkins are known for their signature grooves, so this step is crucial. Using light, curved lines, divide the oval into sections. Aim for around five to seven sections, depending on how detailed you want your pumpkin to be. Pro tip: keep the lines gentle and flowing to give your pumpkin that natural, organic look.
Step 3: Sketch the Stem
No pumpkin is complete without a stem, right? To draw the stem, start by sketching a small, irregular shape at the top of your pumpkin. Think of it as a tiny tree trunk—rough, textured, and full of character. Use short, jagged lines to give it that authentic pumpkin vibe.
Step 4: Refine the Details
Now that you’ve got the basic structure in place, it’s time to refine the details. Go over your lines, making them darker and more defined. Pay attention to the curves of the ribbing, the texture of the stem, and the overall shape of your pumpkin. This is where your artistic flair really comes into play!
Step 5: Add Shadows and Highlights
Shading is what brings your pumpkin to life. Use your pencil to add shadows in the grooves of the ribbing and around the stem. This will give your pumpkin depth and dimension. For highlights, leave some areas of the paper untouched or use an eraser to create lighter spots. Trust me, this step makes all the difference!
Pro Tips for Drawing Pumpkins Like a Pro
Here are a few insider tips to take your pumpkin drawings to the next level:
- Study real pumpkins: Take a closer look at pumpkins in real life or online. Notice the curves, textures, and imperfections. These details will add realism to your drawings.
- Experiment with colors: Pumpkins aren’t just orange! Try using different shades of yellow, brown, and green to create a more vibrant piece.
- Practice makes perfect: Like any skill, drawing takes practice. Don’t be discouraged if your first few attempts don’t turn out exactly as you hoped. Keep at it, and you’ll see improvement in no time!
And don’t forget: have fun! Drawing is all about expressing yourself, so let your creativity run wild.
Common Mistakes to Avoid
Even the best artists make mistakes, but there are a few common pitfalls to watch out for when learning how to draw a pumpkin:
- Overthinking the shape: Pumpkins aren’t perfect circles, so don’t stress too much about getting the shape exactly right. Embrace the imperfections!
- Ignoring the ribbing: The ribbing is what makes a pumpkin look like a pumpkin. Don’t skip this step—it’s what gives your drawing character.
- Forgetting the stem: The stem is a key feature of a pumpkin, so don’t forget to include it in your drawing. It adds that extra bit of realism.
Remember, mistakes are part of the learning process. The more you practice, the better you’ll get!
Adding Personality to Your Pumpkin
Creating Unique Designs
Once you’ve mastered the basics, it’s time to get creative and add some personality to your pumpkin. Think about what makes your pumpkin unique. Does it have a happy face? A spooky grin? Or maybe it’s a pumpkin with a story to tell. The possibilities are endless!
Using Different Techniques
Don’t be afraid to experiment with different techniques to enhance your pumpkin drawings. Try using watercolors, markers, or even digital tools to bring your creations to life. Each medium offers its own set of challenges and rewards, so don’t be afraid to step out of your comfort zone.
Real-Life Examples: Inspiration from Around the World
Looking for inspiration? Check out some of the amazing pumpkin art created by artists around the world. From intricate carvings to stunning paintings, there’s so much to discover. Websites like Pinterest and Instagram are great places to find inspiration and see how other artists are putting their own spin on pumpkin drawings.
And don’t forget: inspiration can come from anywhere. Whether it’s a pumpkin patch in your neighborhood or a piece of art in a museum, keep your eyes open for new ideas and techniques.
Conclusion: Your Pumpkin Drawing Journey Awaits
Well, there you have it, folks! You now know how to draw a pumpkin like a pro. From the basic shape to the finishing touches, you’ve got all the tools you need to create your own pumpkin masterpieces. So what are you waiting for? Grab your pencil and start drawing!
And remember: the more you practice, the better you’ll get. Don’t be afraid to make mistakes and experiment with new techniques. Most importantly, have fun and enjoy the process. Your creativity is your superpower, so use it wisely!
So, what are you waiting for? Share your pumpkin drawings with us in the comments below, or tag us on social media. We’d love to see what you create! And don’t forget to check out our other articles for more tips and tricks on all things art. Happy drawing, and see you next time!
Table of Contents
- Why Learning How to Draw a Pumpkin is Worth Your Time
- Getting Started: What You’ll Need
- Step-by-Step Guide: How to Draw a Pumpkin
- Step 1: Start with the Basic Shape
- Step 2: Add the Ribbing
- Step 3: Sketch the Stem
- Step 4: Refine the Details
- Step 5: Add Shadows and Highlights
- Pro Tips for Drawing Pumpkins Like a Pro
- Common Mistakes to Avoid
- Adding Personality to Your Pumpkin
- Real-Life Examples: Inspiration from Around the World
- Conclusion: Your Pumpkin Drawing Journey Awaits


