How To Fill Out A Check: A Beginner’s Guide You’ll Love
Let’s face it, folks, filling out a check might seem like ancient history in this digital era, but it’s still a critical life skill that everyone should know. Whether you’re paying rent, sending money to family, or settling an old-school bill, knowing how to fill out a check properly is essential. But don’t sweat it—we’re here to break it down step by step so you can master this process like a pro.
In today’s world, where Venmo and PayPal reign supreme, checks might feel like relics of the past. But trust me, they’re not going anywhere anytime soon. From landlords to small businesses, there are still plenty of situations where a good old-fashioned check is required. And guess what? It’s not as complicated as it seems.
By the end of this article, you’ll be so confident in filling out a check that you’ll wonder why you ever hesitated. So grab a pen, a checkbook, and let’s dive into the world of check-writing like it’s no big deal. Ready? Let’s go!
Table of Contents
- Why Checks Still Matter in 2023
- Understanding the Parts of a Check
- Step-by-Step Guide to Filling Out a Check
- Common Mistakes to Avoid When Writing Checks
- Safety Tips for Writing Checks Securely
- The Debate: Online Payments vs. Checks
- FAQ About Filling Out Checks
- A Brief History of Checks
- When Should You Use Checks?
- Conclusion: Master the Art of Check-Writing
Why Checks Still Matter in 2023
Alright, let’s address the elephant in the room: why even bother with checks when we’ve got apps that can transfer money in seconds? Well, my friend, there are still plenty of reasons checks remain relevant. For starters, they’re a secure and reliable way to pay, especially for larger transactions like rent or tuition.
Plus, not everyone has access to online banking, and some people simply prefer the old-school method. Checks also provide a paper trail, which can be super helpful if there’s ever a dispute about payment. So yeah, they’re not going extinct anytime soon.
Understanding the Parts of a Check
Before we dive into the nitty-gritty of how to fill out a check, it’s important to understand what all those little boxes and lines mean. Here’s a quick rundown:
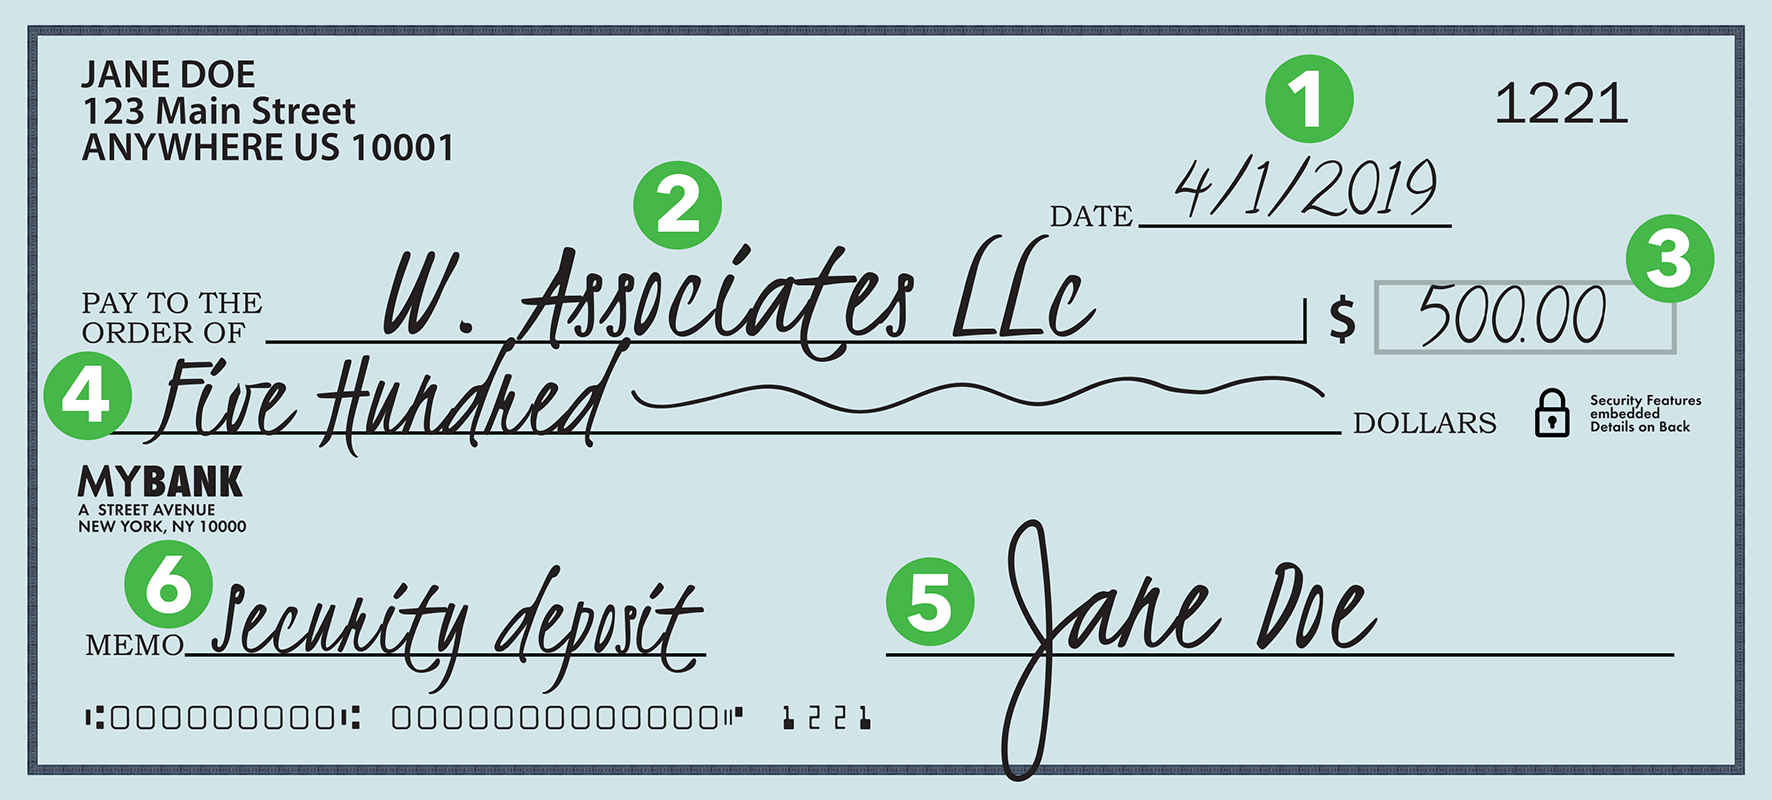
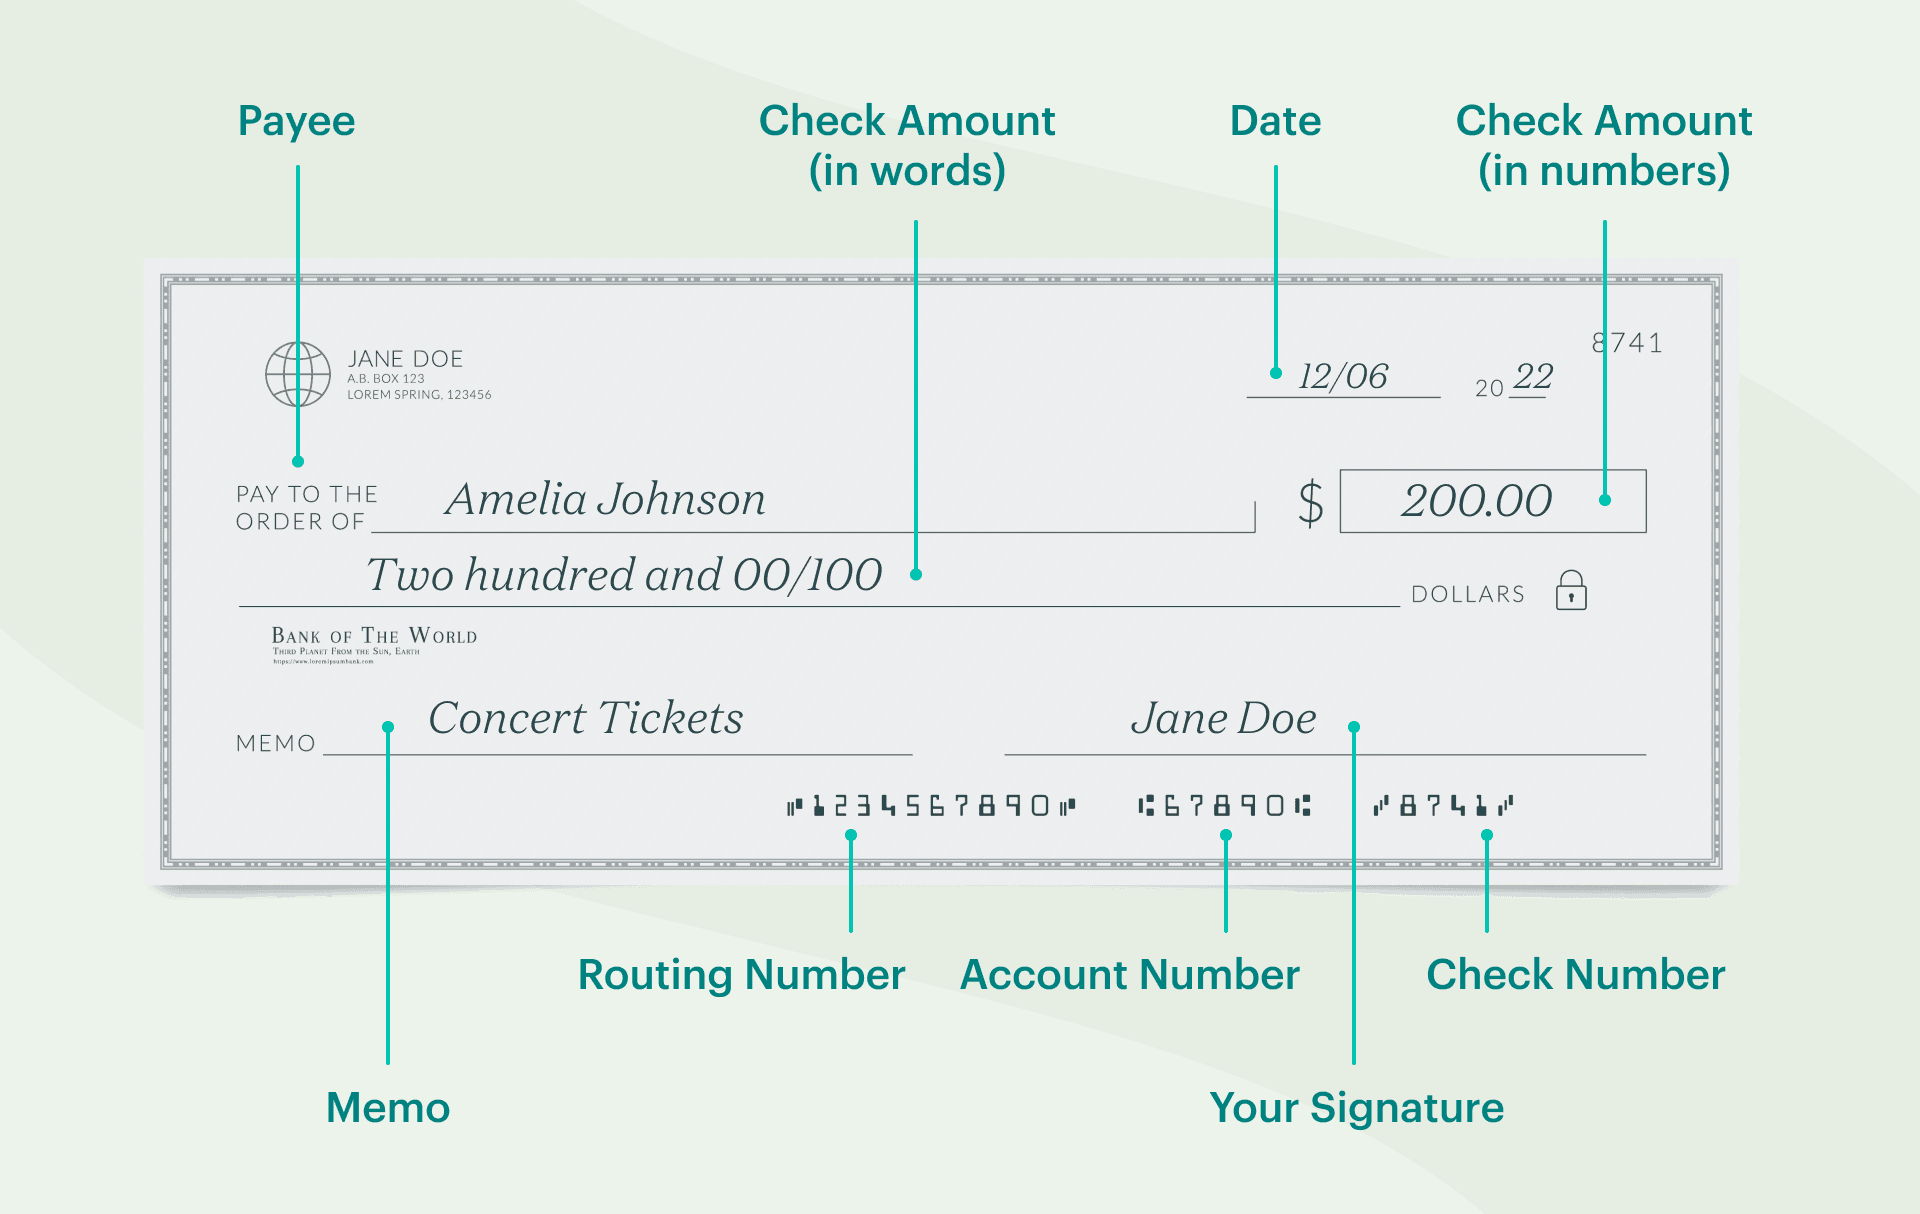
Key Components of a Check
- Date Line: This is where you write the date the check is being written.
- Payee Line: The name of the person or business receiving the money goes here.
- Amount Box: The numerical value of the check goes here.
- Amount Line: The written-out version of the amount goes here.
- Signature Line: Your John Hancock goes here to make the check official.
- Memo Line: Optional, but you can use this to note what the check is for.
Now that we’ve got the basics down, let’s move on to the fun part—actually writing the check!
Step-by-Step Guide to Filling Out a Check
Okay, here’s where the magic happens. Follow these steps, and you’ll be filling out checks like a boss in no time.
Step 1: Write the Date
Start by writing the current date in the top-right corner. It’s pretty straightforward, but hey, even the simplest steps can trip you up if you’re not paying attention.
Step 2: Fill in the Payee
Next, write the name of the person or business you’re paying on the “Pay to the Order of” line. Make sure to spell their name correctly—no typos allowed!
Step 3: Enter the Amount Numerically
In the little box next to the payee line, write the amount you’re paying in numbers. For example, if you’re paying $150, write “150.00.” Don’t forget the decimal point!
Step 4: Write the Amount in Words
Now, write out the amount in words on the line below the payee. For $150, you’d write “One hundred fifty and 00/100.” This step might feel a bit old-school, but it’s crucial for preventing fraud.
Step 5: Sign the Check
Finally, sign your name on the signature line. Without your signature, the check is basically useless. Easy peasy, right?
Common Mistakes to Avoid When Writing Checks
Even the best of us make mistakes sometimes, but when it comes to checks, errors can cost you big time. Here are a few common blunders to watch out for:
- Forgetting to Sign: A check without a signature is like a car without wheels—it’s not going anywhere.
- Leaving Blank Spaces: Always fill in every line completely to prevent someone from altering the check.
- Using Incorrect Dates: Writing the wrong date can cause delays or even lead to the check being rejected.
- Not Matching Numerical and Written Amounts: If the numbers and words don’t match, the bank might reject the check.
Now that you know what not to do, let’s talk about staying safe while writing checks.
Safety Tips for Writing Checks Securely
Checks might seem low-tech, but they can still be vulnerable to fraud if you’re not careful. Here are a few tips to keep your checks safe:
- Use a Pen: Always write checks with a pen to prevent alterations.
- Keep Your Checkbook Secure: Don’t leave your checkbook lying around where others can access it.
- Monitor Your Account: Regularly check your bank statements for any suspicious activity.
- Limit Information: Don’t write unnecessary personal details on the check, like your Social Security number.
With these safety measures in place, you can rest easy knowing your checks are secure.
The Debate: Online Payments vs. Checks
Now, let’s tackle the big question: are checks better than online payments? The answer, as with most things in life, depends on the situation. Online payments are fast and convenient, but checks offer a level of security and traceability that digital transactions sometimes lack.
For instance, if you’re paying a landlord who doesn’t accept online payments, a check is your best bet. On the other hand, if you’re splitting dinner with friends, Venmo might be the way to go. It’s all about knowing when to use each method.
FAQ About Filling Out Checks
Got questions? We’ve got answers. Here are some frequently asked questions about checks:
Q: Can I write a check to myself?
A: Absolutely! Just write “Cash” or your own name on the payee line.
Q: What happens if I write the wrong date on a check?
A: The bank might reject the check, so it’s best to double-check the date before signing.
Q: How long is a check valid?
A: Typically, checks are valid for six months from the date written, but this can vary by bank.
A Brief History of Checks
Believe it or not, checks have been around for centuries. The first known checks date back to the Roman Empire, and they’ve evolved quite a bit since then. Today’s checks are a far cry from those ancient documents, but the basic concept remains the same: a written promise to pay a certain amount of money.
Understanding the history of checks can give you a deeper appreciation for this financial tool and its place in modern society.
When Should You Use Checks?
Now that you know how to fill out a check, you might be wondering when it’s appropriate to use one. Here are a few scenarios where checks are the way to go:
- Rent Payments: Many landlords still prefer checks for rent payments.
- Large Purchases: Checks are great for paying for big-ticket items like furniture or appliances.
- Charitable Donations: Writing a check to your favorite charity provides a clear record of your contribution.
- Business Transactions: Some small businesses still rely on checks for payments.
So whether you’re paying rent or donating to a cause you care about, checks have got you covered.
Conclusion: Master the Art of Check-Writing
And there you have it, folks—a comprehensive guide to filling out a check. From understanding the parts of a check to avoiding common mistakes, you’re now equipped with the knowledge to handle any check-writing situation that comes your way.
Remember, practice makes perfect, so don’t be afraid to write a few checks and get comfortable with the process. And if you ever have questions or need clarification, feel free to drop a comment below. We’re here to help!
Now go forth and conquer the world of check-writing. You’ve got this!

