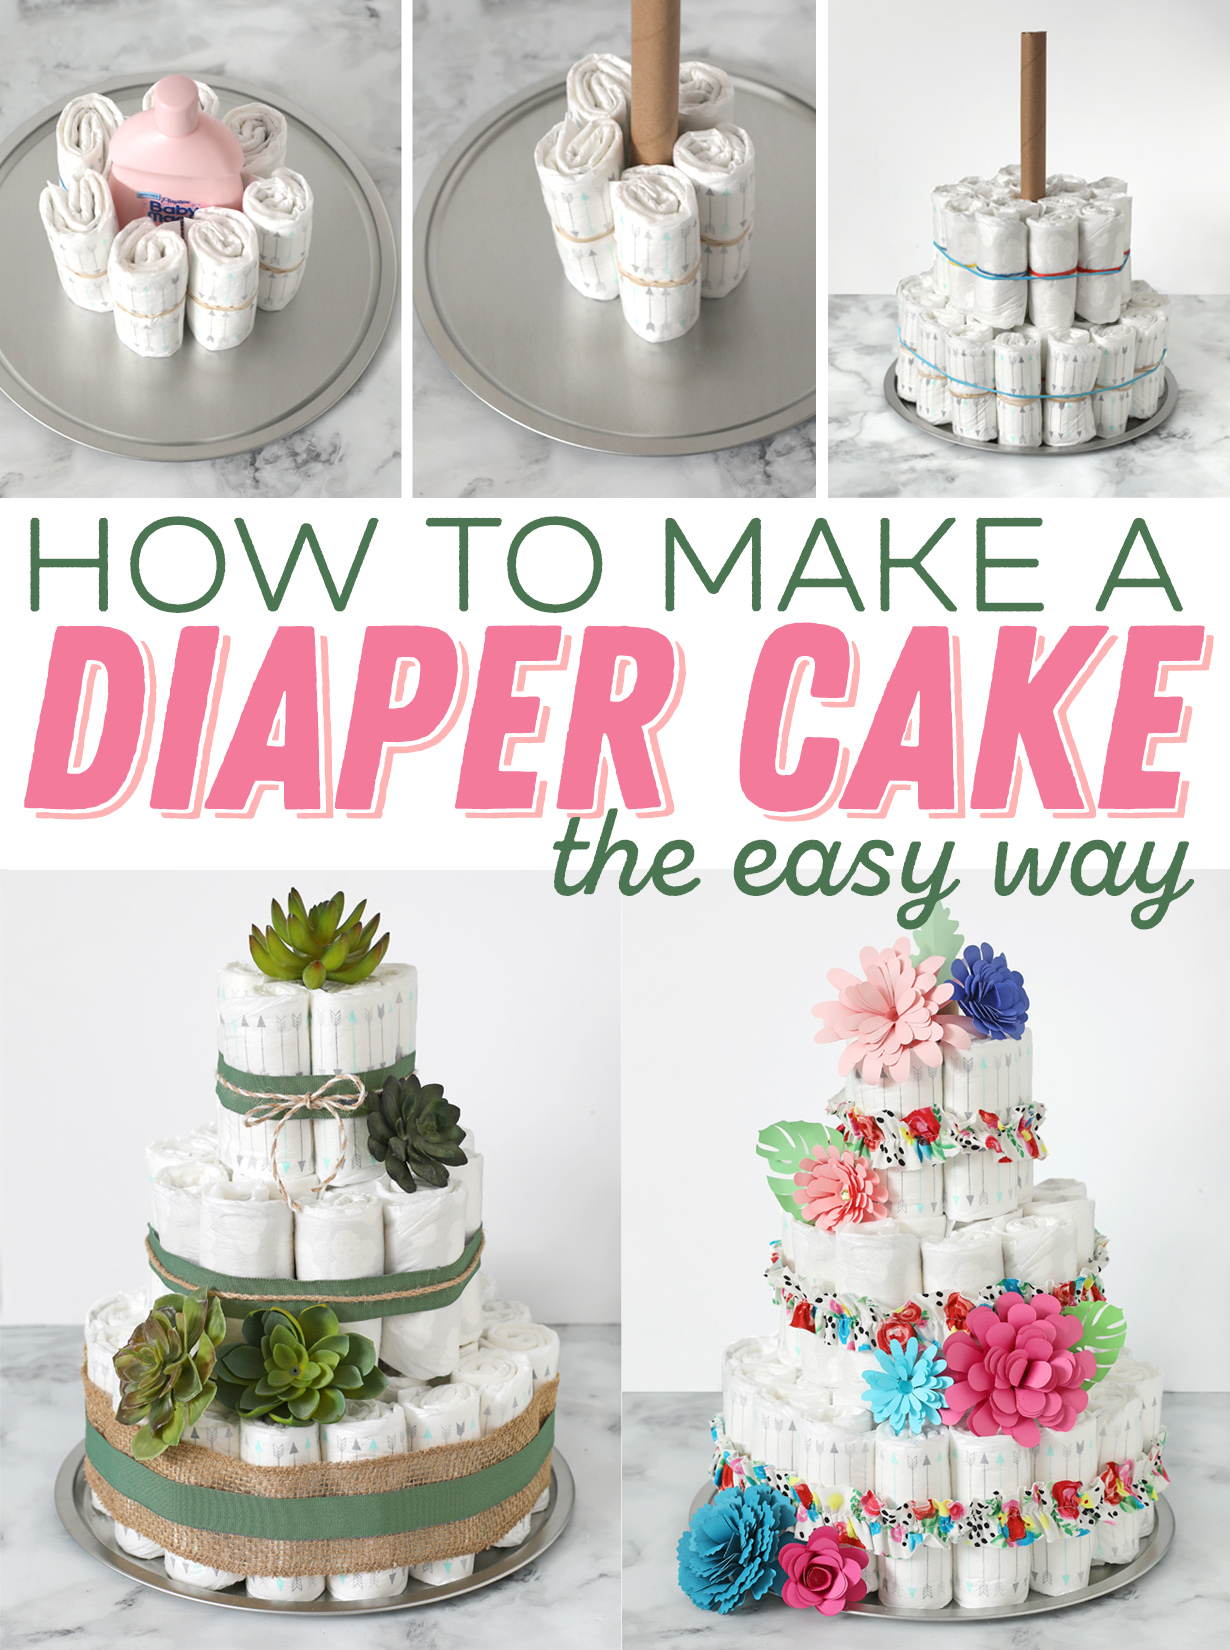
How To Make A Diaper Cake: A Fun And Easy Guide For Every Occasion
Alright folks, let’s dive right into it. Learning how to make a diaper cake is not just a craft; it’s a game-changer for baby showers, birthdays, or even as a unique gift. Imagine walking into a room with a beautifully crafted diaper cake that doubles as a practical present. It’s like hitting two birds with one stone—super creative and super useful. Who wouldn’t love that? So, whether you’re a first-timer or just looking to level up your crafting skills, stick around because we’ve got all the tips and tricks you need.
Now, before we get too deep into the nitty-gritty, let’s talk about why diaper cakes are such a big deal. They’re not just cute—they’re practical. Unlike some gifts that end up gathering dust, diaper cakes provide essential items for new parents. Think about it: diapers, wipes, and baby essentials wrapped up in a beautiful package. It’s like giving a gift that keeps on giving. Plus, they’re customizable, meaning you can tailor them to fit any theme or occasion.
So, are you ready to turn those plain old diapers into a masterpiece? Stick with me, and I’ll walk you through every step of the process. From choosing the right materials to assembling your cake, we’ve got you covered. And trust me, by the end of this guide, you’ll be a diaper cake pro!
What You Need to Know About Diaper Cakes
Before we jump into the how-to section, let’s take a moment to understand what makes a diaper cake so special. At its core, a diaper cake is essentially a stack of diapers arranged in layers to resemble a cake. But don’t let the simplicity fool you; there’s an art to it. The best diaper cakes are not only visually appealing but also functional, making them a win-win for both the giver and the receiver.
Why Choose a Diaper Cake?
Here’s the deal: diaper cakes are more than just a decorative piece. They’re a thoughtful gesture that combines creativity with practicality. For new parents, diapers are a necessity, and having a supply on hand can be a lifesaver. Plus, diaper cakes can be customized with additional items like bottles, blankets, and toys, making them even more special.
Let’s break it down:
- Practicality: Diaper cakes provide essential items that new parents will use every day.
- Customization: You can tailor the cake to match the baby’s gender, theme, or occasion.
- Long-Lasting: Unlike traditional cakes, diaper cakes don’t spoil. They’re a gift that keeps on giving.
Step-by-Step Guide: How to Make a Diaper Cake
Making a diaper cake might sound intimidating, but trust me, it’s easier than you think. With the right materials and a little patience, you’ll have a stunning diaper cake in no time. So, grab your supplies, and let’s get started!
Gather Your Supplies
First things first, you’ll need the right materials. Here’s a list of everything you’ll need:
- Diapers (preferably size 1 or 2)
- Floral tape or ribbon
- Pipe cleaners
- Plastic wrap or tissue paper
- Cardboard circles (for the base)
- Decorative items (like bows, baby clothes, or toys)
Pro tip: Make sure the diapers you choose are of good quality. After all, this is a gift that will be used, so you want it to be practical as well as pretty.
Prepare the Diapers
Now that you’ve got your supplies, it’s time to prepare the diapers. Take each diaper and roll it tightly from the back to the front. Secure the roll with a piece of floral tape or a pipe cleaner. This will keep the diapers in place and give your cake a neat, uniform look.
Here’s a quick tip: If you’re short on time, you can use pre-rolled diapers. Some craft stores sell them, and they can save you a lot of effort. But if you’re feeling crafty, rolling them yourself adds a personal touch.
Building the Layers
Once your diapers are rolled and ready, it’s time to start building your cake. This is where the fun begins!
Layer 1: The Base
Start by placing a cardboard circle on a flat surface. This will serve as the base for your cake. Arrange the rolled diapers in a circular pattern on the cardboard, ensuring they’re snug and tight. Once you’ve completed the first layer, wrap it with floral tape or ribbon to hold everything in place.
Layer 2: The Middle
For the second layer, repeat the process, but this time, use fewer diapers to create a smaller circle. Place this layer on top of the first, securing it with tape or ribbon. This will give your cake a tiered effect.
Layer 3: The Top
The top layer should be the smallest. Again, arrange the diapers in a circle and secure them with tape or ribbon. Once all three layers are in place, you’ll have the basic structure of your diaper cake.
Adding the Finishing Touches
Now that your cake is assembled, it’s time to add the finishing touches. This is where you can get creative and make your cake truly unique.
Decorating Your Cake
Use decorative items like bows, baby clothes, or small toys to embellish your cake. You can also add a personalized message or a small gift card for an extra special touch. The possibilities are endless, so feel free to let your imagination run wild.
Here’s a fun idea: If you’re making a diaper cake for a baby shower, consider adding a themed decoration. For example, if it’s a boy, you could use blue ribbons and a small car toy. For a girl, pink ribbons and a doll would be perfect.
Tips and Tricks for Success
Creating a diaper cake is all about attention to detail. Here are a few tips to help you achieve perfection:
- Practice Makes Perfect: If it’s your first time, don’t be afraid to practice before the big day. The more you practice, the better you’ll get.
- Keep It Simple: While it’s tempting to go overboard with decorations, remember that simplicity is key. Too many embellishments can overwhelm the cake.
- Use Quality Materials: Investing in good-quality diapers and decorations will make a big difference in the final result.
Common Mistakes to Avoid
Even the best diaper cake makers make mistakes. Here are a few common pitfalls to watch out for:
- Not Securing the Diapers Properly: Make sure each diaper is tightly rolled and secured. Loose diapers can ruin the structure of your cake.
- Overloading the Cake: Too many decorations can make your cake look messy. Stick to a few key items for a polished look.
- Forgetting the Practicality: Remember, this is a gift that will be used. Don’t get so caught up in the aesthetics that you forget the practical side.
Final Thoughts
And there you have it, folks! A complete guide on how to make a diaper cake that’s both beautiful and practical. Whether you’re a seasoned crafter or a first-timer, I hope this guide has given you the confidence to create your very own diaper cake masterpiece.
So, what are you waiting for? Grab your supplies and get crafting. And don’t forget to share your creations with us. We’d love to see what you come up with. Happy crafting, and remember, the joy of giving is in the details!
References
For more information on crafting and DIY projects, check out these trusted resources:
Table of Contents
- What You Need to Know About Diaper Cakes
- Step-by-Step Guide: How to Make a Diaper Cake
- Building the Layers
- Adding the Finishing Touches
- Tips and Tricks for Success
- Common Mistakes to Avoid
- Final Thoughts
- References


