How To Draw A Tiger: Step-by-Step Guide For Beginners And Pros
Alright, listen up, folks! If you’ve ever wondered how to draw a tiger but thought it was too hard, you’re in the right place. Drawing a tiger might seem intimidating with all those stripes and majestic details, but don’t sweat it. We’re gonna break it down into bite-sized steps that even a complete beginner can follow. So grab your pencils and let’s get started, shall we?
Now, before we dive into the nitty-gritty of tiger drawing, let me tell you something cool. Tigers are not just big cats; they’re symbols of power, grace, and mystery. Capturing their essence in a drawing is like telling a story on paper. And trust me, once you get the hang of it, you’ll be hooked!
This guide is packed with tips, tricks, and techniques to help you master how to draw a tiger. Whether you’re a doodler or an aspiring artist, you’ll find everything you need right here. So, ready to unleash your inner artist? Let’s do this!
Table of Contents
Introduction: Why Tigers Are the Pawsome Choice
Tools You’ll Need to Draw a Tiger
Understanding the Basics of Tiger Anatomy
Step 1: Sketch the Basic Shapes
Step 2: Add the Outline of the Tiger
Step 3: Draw the Facial Features
Step 4: Add the Stripes and Fur Details
Step 5: Shade Your Tiger Drawing
Common Mistakes to Avoid When Drawing Tigers
Pro Tips for Drawing Tigers Like a Pro
Conclusion: Keep Practicing and Have Fun
Why Tigers Are the Pawsome Choice
So, why draw a tiger anyway? Well, tigers are like the rock stars of the animal kingdom. They’re fierce, beautiful, and full of character. Plus, they’re a great subject for practicing your skills because they combine so many elements—muscular bodies, intricate patterns, and expressive faces. Learning how to draw a tiger is like leveling up in the art world.
And guess what? Drawing a tiger isn’t as hard as it looks. Sure, it takes practice, but with the right approach, anyone can do it. In this guide, we’ll walk you through every step, from sketching the basic shapes to adding those iconic stripes. By the end, you’ll have a tiger drawing that’s ready to roar!
Tools You’ll Need to Draw a Tiger
Before we jump into the drawing part, let’s talk about what you’ll need. You don’t have to go out and buy an entire art studio, but having the right tools can make a big difference. Here’s what you’ll need:
Essential Drawing Tools
- Pencils: Get a range of pencils, like HB, 2B, and 4B, for different shades.
- Eraser: A kneaded eraser is great for making soft corrections.
- Sketchpad: A good-quality paper will help your drawing look its best.
- Reference Photo: Find a clear picture of a tiger to use as a guide.
- Blending Tools: Use blending stumps or cotton swabs for shading.
Don’t stress too much about having the fanciest supplies. Even a simple pencil and paper will work just fine when you’re starting out.
Understanding the Basics of Tiger Anatomy
To draw a convincing tiger, you need to understand how its body works. Tigers have powerful muscles, flexible spines, and distinct patterns that set them apart from other big cats. Take a moment to study the anatomy of a tiger before you start drawing.
Here are a few key points to keep in mind:
- Tigers have a muscular build with a curved spine that allows them to pounce.
- Their heads are round and broad, with large eyes and a strong jawline.
- Pay attention to the placement of the ears—they’re small and rounded.
- Tigers have long tails that help with balance during movement.
Understanding these basics will make your tiger drawing look more realistic. Trust me, it’s all about the details!
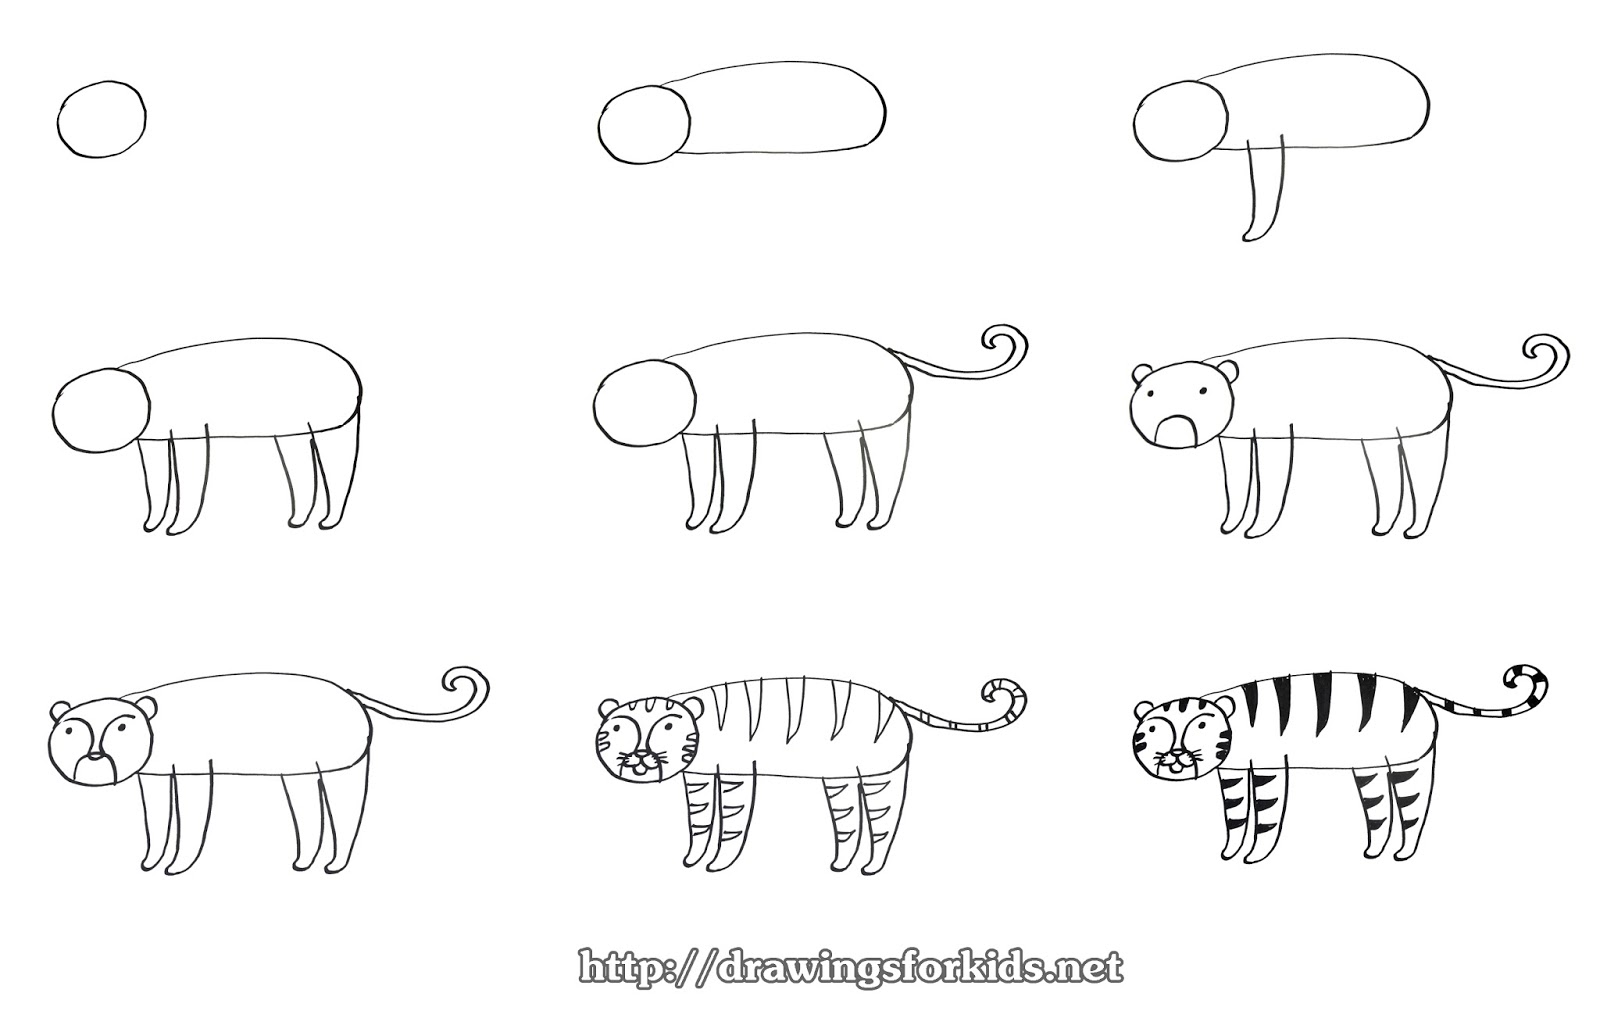
Step 1: Sketch the Basic Shapes
Alright, let’s start drawing! The first step is to sketch the basic shapes of the tiger’s body. Think of it like building a framework for your drawing.
Here’s what you do:
- Draw an oval for the body. This will be the main part of the tiger.
- Add a smaller circle for the head, connected to the body by a curved line.
- Sketch four lines for the legs and a long curve for the tail.
These shapes don’t have to be perfect—they’re just guides to help you structure the drawing. Keep it loose and relaxed at this stage.
Why Start with Shapes?
Starting with basic shapes gives you a solid foundation for your drawing. It helps you get the proportions right and ensures that everything fits together nicely. Remember, you can always adjust as you go along.
Step 2: Add the Outline of the Tiger
Now that you’ve got the basic shapes down, it’s time to refine the outline. This is where you start turning those simple shapes into a tiger.
Here’s how:
- Define the tiger’s body by smoothing out the oval shape.
- Shape the head by rounding the edges and adding the jawline.
- Draw the legs and paws, making sure they’re proportionate to the body.
- Add the tail, giving it a slight curve for realism.
Take your time with this step. The outline is the backbone of your drawing, so make sure it’s as accurate as possible.
Pro Tip: Use a Light Hand
When sketching the outline, use a light hand so you can easily erase any mistakes. You’ll go over the lines later with a darker pencil once you’re happy with the shape.
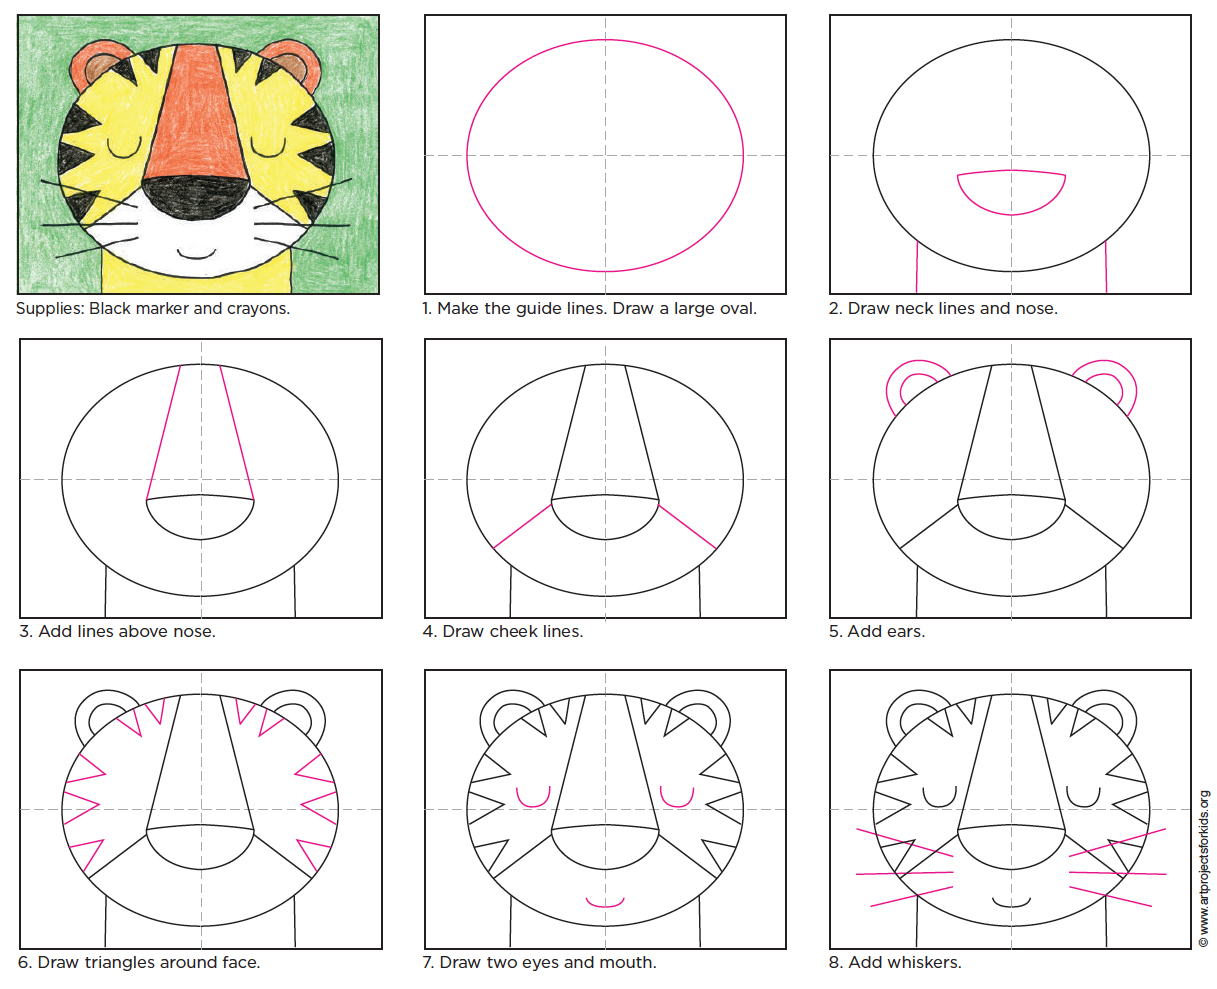
Step 3: Draw the Facial Features
The tiger’s face is one of the most important parts of the drawing. It’s what gives your tiger its personality and expression. So, let’s focus on getting it right.
Here’s what you need to do:
- Start with the eyes. Tigers have large, almond-shaped eyes with vertical pupils.
- Add the nose, which is small and black, right in the center of the face.
- Draw the mouth, complete with sharp teeth if the tiger is roaring.
- Don’t forget the whiskers—they add character and realism.
Facial features are all about symmetry, so try to keep everything balanced. If one eye is too big or the nose is off-center, it’ll throw off the whole drawing.
Fun Fact About Tiger Eyes
Tigers have incredible vision, especially at night. Their eyes are adapted for hunting in low light, which makes them even more fascinating to draw. Capture that intensity in your tiger’s gaze, and you’ll instantly elevate your drawing.
Step 4: Add the Stripes and Fur Details
Now comes the fun part—adding those iconic tiger stripes! Stripes are what make tigers unique, so take your time with this step.
Here’s how to do it:
- Study your reference photo to see how the stripes flow across the tiger’s body.
- Use a darker pencil to sketch the stripes, keeping them irregular and natural-looking.
- Add fur details by drawing short, curved lines along the edges of the tiger’s body.
Remember, tiger stripes are like fingerprints—they’re unique to each individual. So, don’t worry about making them perfect. Just focus on capturing the overall pattern.
Why Are Stripes Important?
Stripes aren’t just for looks; they serve a purpose in the wild. They help tigers blend into their surroundings, making them nearly invisible to prey. When you draw stripes, think about how they interact with the tiger’s muscles and body shape. It’ll make your drawing look more dynamic.
Step 5: Shade Your Tiger Drawing
The final step is shading, which brings your tiger to life. Shading adds depth and dimension to your drawing, making it look more realistic.
Here’s how to shade your tiger:
- Identify the light source in your drawing. This will determine where the shadows fall.
- Use a range of pencils to create different shades, from light to dark.
- Blend the shades smoothly using a blending stump or cotton swab.
- Highlight the areas that catch the most light, like the eyes and fur tips.
Shading is all about patience. Take your time and build up the layers gradually. The more you practice, the better you’ll get.
Shading Techniques to Try
There are several shading techniques you can use to enhance your tiger drawing:
- Hatching: Parallel lines that create texture and depth.
- Cross-hatching: Intersecting lines that add complexity to the shading.
- Stippling: Tiny dots that build up shadows and highlights.
Experiment with these techniques to find what works best for you. Mixing them up can add variety and interest to your drawing.
Common Mistakes to Avoid When Drawing Tigers
Even the best artists make mistakes, but learning from them is what makes you better. Here are some common pitfalls to watch out for when drawing tigers:
- Ignoring proportions: Make sure the head, body, and legs are in proportion to each other.
- Overdoing the stripes: Too many stripes can make the drawing look messy. Keep it natural.
- Forgetting the fur: Tigers have thick fur, so don’t neglect the details.
- Skipping shading: Shading is what gives your drawing depth and realism. Don’t rush through it.
By avoiding these mistakes, you’ll be well on your way to creating a stunning tiger drawing.
Pro Tips for Drawing Tigers Like a Pro
Here are a few extra tips to help you take your tiger drawings to the next level:
Tips for Beginners
- Practice drawing basic shapes and proportions regularly.
- Use reference photos to study tiger anatomy and movement.
- Start with simple sketches before moving on to detailed drawings.
Tips for Advanced Artists
- Experiment with different mediums, like charcoal or colored pencils.
- Study the work of other artists to learn new techniques.
- Challenge yourself by drawing tigers in different poses and environments.
Remember, practice makes perfect. The more you draw, the better you’ll get. So, keep at it!
Conclusion: Keep Practicing and Have Fun
And there you have it, folks—a step-by-step guide on how to draw a tiger. From sketching the basic shapes to adding those iconic stripes, you now have all the tools you need to create a masterpiece. So, what are you waiting for? Grab your pencils and start drawing!
Remember, drawing is all about having fun and expressing yourself. Don’t worry too much about making mistakes—every mistake is a learning opportunity. The more you practice, the better you’ll get. And who knows? Maybe one day you’ll be drawing tigers that could fool even the most discerning art critic.
So, if you’ve enjoyed this guide, feel free to share it with your friends or leave a comment below. Let’s keep the art community thriving! And hey, if you’re feeling adventurous, why not try drawing other animals too? The world is your canvas, and the possibilities are endless.
